
Jenkins CI/CD Pipeline setup on EC2 With Git and EKS

1. Create EC2 instance on AWS.
2. Connect with Ec2 instance via SSH
3. Install JDK on AWS EC2 Instance
The next requirement is we need to install JAVA(JDK) on the EC2 instance.
Now before we do the JDK installation lets first update the package manager of the virtual machine -
sudo apt-get updateCheck if you have java already installed onto your EC2 machine by running the following command -
java -versionIn case if you do not have java installed then you will see the following message -
Command 'java' not found, but can be installed with:sudo apt install openjdk-11-jre-headless # version 11.0.11+9-0ubuntu2~20.04, or
sudo apt install default-jre # version 2:1.11-72
sudo apt install openjdk-13-jre-headless # version 13.0.7+5-0ubuntu1~20.04
sudo apt install openjdk-16-jre-headless # version 16.0.1+9-1~20.04
sudo apt install openjdk-8-jre-headless # version 8u292-b10-0ubuntu1~20.04
sudo apt install openjdk-14-jre-headless # version 14.0.2+12-1~20.04But you can install java by running the following command
sudo apt install openjdk-11-jre-headlessIf you see the following message then you have installed java successfully -
openjdk version "11.0.11" 2021-04-20
OpenJDK Runtime Environment (build 11.0.11+9-Ubuntu-0ubuntu2.20.04)
OpenJDK 64-Bit Server VM (build 11.0.11+9-Ubuntu-0ubuntu2.20.04, mixed mode, sharing)
4. Install and Setup Jenkins
The next step would be to install the Jenkins. You can follow the official Jenkins Installation guide also. But here I have listed down the steps for installing the Jenkins on the EC2 instance.
First, we need to add the Jenkins repository to the package manager -
wget -q -O - https://pkg.jenkins.io/debian-stable/jenkins.io.key | sudo apt-key add -sudo sh -c 'echo deb https://pkg.jenkins.io/debian-stable binary/ > /etc/apt/sources.list.d/jenkins.list'After adding the repository link of Jenkins update the package manager
sudo apt-get updateThen finally install Jenkins using the following command
sudo apt-get install jenkinsOn successful installation, you should see Active Status
sudo service jenkins status● jenkins.service - LSB: Start Jenkins at boot time
Loaded: loaded (/etc/init.d/jenkins; generated)
Active: active (exited) since Tue 2021-06-22 20:31:18 UTC; 37s ago
Docs: man:systemd-sysv-generator(8)
Process: 16297 ExecStart=/etc/init.d/jenkins start (code=exited, status=0/SUCCESS)4.1 Setup jenkins
After installing jenkins lets go back to AWS dashboard -> EC2 -> Instances(running)
Click on the instance ID as mentioned in the above image.
Now we need to find the public IP address of the EC2 machine so that we can access the Jenkins.
Once you click on the instance ID you should see the following page with lots of information about the EC2 instance.
We need to look for Public IPv4 address
Alright now we know the public IP address of the EC2 machine, so now we can access the Jenkins from the browser using the public IP address followed by the port 8080
If you are installing the Jenkins for the first time then you need to supply the initialAdminPassword and you can obtain it from -
sudo cat /var/lib/jenkins/secrets/initialAdminPasswordCopy the password and paste it into the initial page of the Jenkins. After that, Jenkins will prompt you for installing the plugins.
Opt for install suggested plugin -
After completing the installation of the suggested plugin you need to set the First Admin User for Jenkins
Also, check the instance configuration because it will be used for accessing the Jenkins
And now your Jenkins is ready for use
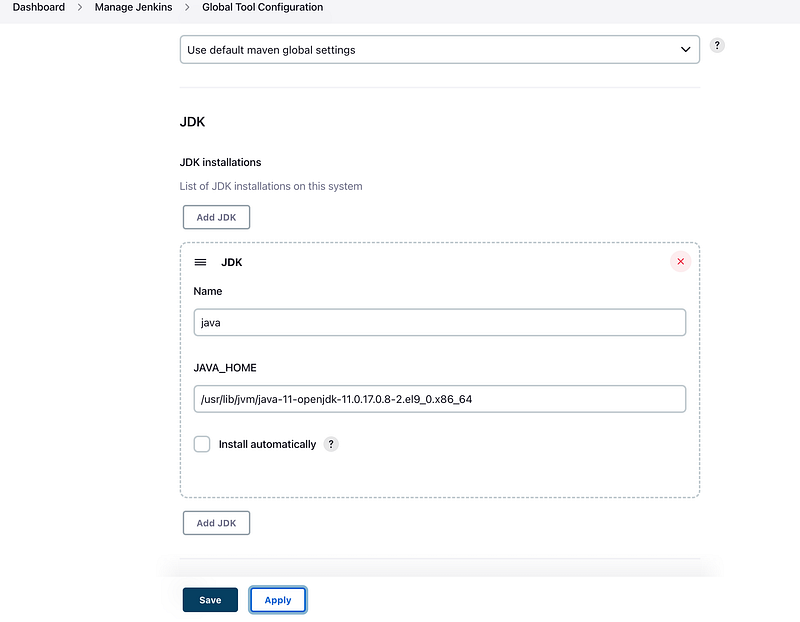
4.2 Setup Gradle
In this lab session, we will be using the Spring Boot Application, so we need to use a build tool for compilation and building the JAR file and for that, we will be using Gradle as the preferred tool.
For setting up the gradle Goto -> Manage Jenkins -> Global Tool Configuration -> Gradle
Here is the screenshot for your reference -
5. Update visudo and assign administration privileges to jenkins user
Now we have installed the Jenkins on the EC2 instance. To interact with the Kubernetes cluster Jenkins will be executing the shell script with the Jenkins user, so the Jenkins user should have an administration(superuser) role assigned forehand.
Let’s add jenkins user as an administrator and also ass NOPASSWD so that during the pipeline run it will not ask for root password.
Open the file /etc/sudoers in vi mode
sudo vi /etc/sudoersAdd the following line at the end of the file
jenkins ALL=(ALL) NOPASSWD: ALLAfter adding the line save and quit the file.
Now we can use Jenkins as root user and for that run the following command -
sudo su - jenkins6. Install Docker
Now we need to install the docker after installing the Jenkins.
The docker installation will be done by the Jenkins user because now it has root user privileges.
Use the following command for installing the docker -
sudo apt install docker.ioAfter installing the docker you can verify it by simply typing the docker --version onto the terminal
It should return you with the latest version of the docker
Docker version 20.10.2, build 20.10.2-0ubuntu1~20.04.26.1 Add jenkins user to Docker group
Jenkins will be accessing the Docker for building the application Docker images, so we need to add the Jenkins user to the docker group.
sudo usermod -aG docker jenkins7. Install and Setup AWS CLI
Okay so now we have our EC2 machine and Jenkins installed. Now we need to set up the AWS CLI on the EC2 machine so that we can use eksctl in the later stages
Let us get the installation done for AWS CLI
sudo apt install awscliVerify your AWS CLI installation by running the following command -
aws --versionIt should return you with the version of CLI
aws-cli/1.18.69 Python/3.8.5 Linux/5.4.0-1045-aws botocore/1.16.197.1 Configure AWS CLI
Okay now after installing the AWS CLI, let’s configure the AWS CLI so that it can authenticate and communicate with the AWS environment.
To configure the AWS the first command we are going to run is -
aws configureOnce you execute the above command it will ask for the following information -
- AWS Access Key ID [None]:
- AWS Secret Access Key [None]:
- Default region name [None]:
- Default output format [None]:
You can find this information by going into AWS -> My Security Credentials
Then navigate to Access Keys (access key ID and secret access key)
You can click on the Create New Access Key and it will let you generate — AWS Access Key ID, AWS Secret Access Key.
(Note: — Always remember you can only download your access id and secret once, if you misplace the secret and access then you need to recreate the keys again)
Default region name — You can find it from the menu
Alright now we have installed and set up AWS CLI.
8. Install and Setup Kubectl
Moving forward now we need to set up the kubectl also onto the EC2 instance where we set up the Jenkins in the previous steps.
Here is the command for installing kubectl
curl -LO "https://storage.googleapis.com/kubernetes-release/release/$(curl -s https://storage.googleapis.com/kubernetes-release/release/stable.txt)/bin/linux/amd64/kubectl"chmod +x ./kubectlsudo mv ./kubectl /usr/local/binVerify the kubectl installation
Verify the kubectl installation by running the command kubectl version and you should see the following output
Client Version: version.Info{Major:"1", Minor:"21", GitVersion:"v1.21.2", GitCommit:"092fbfbf53427de67cac1e9fa54aaa09a28371d7", GitTreeState:"clean", BuildDate:"2021-06-16T12:59:11Z", GoVersion:"go1.16.5", Compiler:"gc", Platform:"linux/amd64"}
Error from server (Forbidden): <html><head><meta http-equiv='refresh' content='1;url=/login?from=%2Fversion%3Ftimeout%3D32s'/><script>window.location.replace('/login?from=%2Fversion%3Ftimeout%3D32s');</script></head><body style='background-color:white; color:white;'>
9. Install and Setup eksctl
The next thing which we are gonna do is to install the eksctl, which we will be using to create AWS EKS Clusters.
Okay, the first command which we are gonna run to install the eksctl
curl --silent --location "https://github.com/weaveworks/eksctl/releases/latest/download/eksctl_$(uname -s)_amd64.tar.gz" | tar xz -C /tmpsudo mv /tmp/eksctl /usr/local/binVerify the installation by running the command -
eksctl versionAnd it will return you with the version -
0.52.0So at the time of installation, I had 0.52.0
Installing eksctl on other OS
For Mac OS
brew tap weaveworks/tap
brew install weaveworks/tap/eksctl
For Windows
chocolatey install eksctlor Scoop
scoop install eksctl10. Create eks cluster using eksctl
In all the previous 9 steps we were preparing our AWS environment. Now in this step, we are going to create EKS cluster using eksctl
You need the following in order to run the eksctl command
- Name of the cluster : — name jhooq-test-cluster
- Version of Kubernetes : — version 1.17
- Region : — name eu-central-1
- Nodegroup name/worker nodes : worker-nodes
- Node Type : t2.micro
- Number of nodes: -nodes 2
Here is the eksctl command -
eksctl create cluster --name jhooq-test-cluster --version 1.17 --region eu-central-1 --nodegroup-name worker-nodes --node-type t2.micro --nodes 2(*Note — Be patient with the above command because it may take 20–30 minutes to complete)
For me it almost took 20 minutes, here are the timestamps
10.1 Verify the EKS kubernetes cluster from AWS
You can go back to your AWS dashboard and look for Elastic Kubernetes Service -> Clusters
Click on the Cluster Name to verify the worker nodes -
11. Add Docker and GitHub Credentials into Jenkins
As we know Kubernetes is a container orchestration tool and container management we are using docker.
(In case if you haven’t set up Docker Hub Account then please create a DockerHub Account because we are gonna need it.)
Alright so if you are reading this line then I am assuming you have a DockerHub Account and GitHub Account.
Here is the link of GitHub Repository for this project
11.1 Setup Docker Hub Secret Text in Jenkins
You can set the docker credentials by going into -
Goto -> Jenkins -> Manage Jenkins -> Manage Credentials -> Stored scoped to jenkins -> global -> Add Credentials
11.2 Setup GitHub Username and password into Jenkins
Now we add one more username and password for GitHub.
Goto -> Jenkins -> Manage Jenkins -> Manage Credentials -> Stored scoped to jenkins -> global -> Add Credentials
12. Add jenkins stages
Okay, now we can start writing out the Jenkins pipeline for deploying the Spring Boot Application into the Kubernetes Cluster.
12.1 Jenkins stage-1 : Checkout the GitHub Repository
Add the following Jenkins script for checking out the GitHub Repository -
stage("Git Clone"){ git credentialsId: 'GIT_HUB_CREDENTIALS', url: 'https://github.com/rahulwagh/k8s-jenkins-aws'
}12.2 Jenkins stage-2 : Gradle compilation and build
Now after checking out the repository let compile and build the application using Gradle
stage('Gradle Build') {
    sh './gradlew build'
}
12.3 Jenkins stage-3 : Create Docker Container and push to Docker Hub
After successful compilation and build let’s create a Docker image and push to the docker hub
stage("Docker build"){
    sh 'docker version'
    sh 'docker build -t jhooq-docker-demo .'
    sh 'docker image list'
    sh 'docker tag jhooq-docker-demo rahulwagh17/jhooq-docker-demo:jhooq-docker-demo'
}
stage("Push Image to Docker Hub"){
sh 'docker push rahulwagh17/jhooq-docker-demo:jhooq-docker-demo'
}12.4 Jenkins stage-4 : Kubernetes deployment
Finally, do the Kubernetes deployment
stage("kubernetes deployment"){
  sh 'kubectl apply -f k8s-spring-boot-deployment.yml'
}
Here is the complete final script for Jenkins pipeline -
node { stage("Git Clone"){ git credentialsId: 'GIT_HUB_CREDENTIALS', url: 'https://github.com/rahulwagh/k8s-jenkins-aws'
} stage('Gradle Build') { sh './gradlew build' } stage("Docker build"){
sh 'docker version'
sh 'docker build -t jhooq-docker-demo .'
sh 'docker image list'
sh 'docker tag jhooq-docker-demo rahulwagh17/jhooq-docker-demo:jhooq-docker-demo'
} withCredentials([string(credentialsId: 'DOCKER_HUB_PASSWORD', variable: 'PASSWORD')]) {
sh 'docker login -u rahulwagh17 -p $PASSWORD'
} stage("Push Image to Docker Hub"){
sh 'docker push rahulwagh17/jhooq-docker-demo:jhooq-docker-demo'
}
stage("kubernetes deployment"){
sh 'kubectl apply -f k8s-spring-boot-deployment.yml'
}
}13. Build, deploy and test CI/CD pipeline
Create new Pipeline: Goto Jenkins Dashboard or Jenkins home page click on New Item
Pipeline Name: Now enter Jenkins pipeline name and select Pipeline
Add pipeline script: Goto -> Configure and then pipeline section.
Copy the Jenkins script from Step 12 and paste it there.
Build and Run Pipeline: Now goto pipeline and click on build now
Verify the build status:
Verify using kubectl commands
You can also verify the Kubernetes deployment and service with kubectl command .e.g kubectl get deployments, kubectl get service
You can access the rest end point from browser using the EXTERNAL-IP address