
Elastic Search + Django Rest Framework

What is Elasticsearch?
Elasticsearch is a distributed, open-source search and analytics engine designed for handling large volumes of data. It is built on top of the Apache Lucene library and allows for full-text search, faceted search, and real-time analytics.
Elasticsearch provides a powerful query language called the Query DSL (Domain Specific Language) that allows you to specify the criteria for a search and retrieve relevant results. It also provides a built-in data visualization tool called Kibana, which allows you to create interactive visualizations and dashboards based on your data.

Elasticsearch has a few key concepts and structures that are important to understand when working with it.
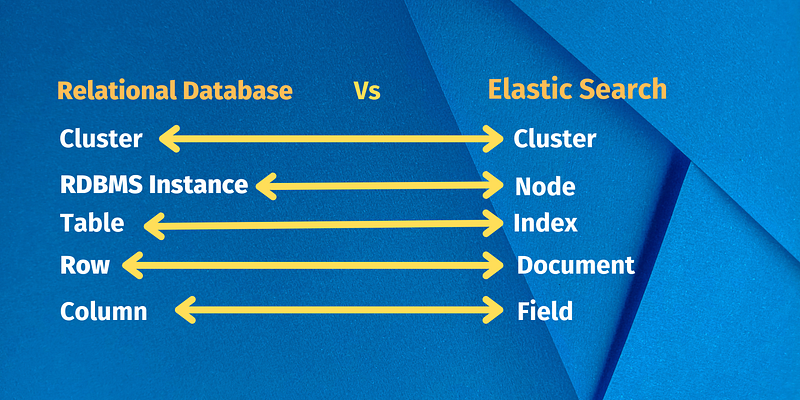
- Index: An index is like a table in a relational database, and it’s where your data is stored. An index is a collection of documents that have similar characteristics.
- Type: An index can contain multiple types, which are used to group similar documents together. A type corresponds to a class of similar documents and is defined by a mapping.
- Document: A document is a JSON object that represents a single piece of data in Elasticsearch. Each document belongs to a specific type and index.
- Shard: An index can be split into multiple shards, which are smaller, self-contained indices. Each shard can have one or more replicas.
- Replica: A replica is a copy of a shard. It is used to provide high availability and to increase the performance of searching by distributing the search load.
- Cluster: A cluster is a collection of one or more nodes that together holds your entire data and provides indexing and search capabilities across all of the nodes.
- Node: A node is a single instance of Elasticsearch that stores data and participates in the cluster’s indexing and search capabilities.
- Mapping: Mapping is the process of defining how a document, and the fields it contains, are stored and indexed. It defines the datatype of each field, such as string, integer, or date, and how it should be indexed and searched.
- Query: A query is a request to search the index for documents that match a specific set of criteria. Elasticsearch provides a powerful query language called the Query DSL, which allows you to specify the criteria for a search and retrieve relevant results.
- Aggregation: A aggregation is a way to summarize and group data in Elasticsearch. It allows you to group data by a certain field, calculate metrics and extract meaningful insights from the data.
If You are curious about the difference between Relational DataBase and Elastic Search.
Project Setup
We’ll create a straightforward blog application. Multiple models will be used in our project, all of which will be serialised and delivered over the Django REST Framework. We’ll build an endpoint that enables us to look for various authors, categories, and articles after integrating Elasticsearch.
We’ll divide our project into the following two apps in order to maintain a clear and modular codebase:
blog- for our Django models, serializers, and ViewSetssearch- for Elasticsearch documents, indexes, and queries
Start by creating a new directory and setting up a new Django project:
$ mkdir django-drf-elasticsearch
$ cd django-drf-elasticsearch
$ python3 -m venv env
$ source env/bin/activate
(env)$ pip install django
(env)$ django-admin.py startproject core .After that, create a new app called blog:
(env)$ python manage.py startapp blog
Register the app in core/settings.py under INSTALLED_APPS:
# core/settings.py
INSTALLED_APPS = [
    'django.contrib.admin',
    'django.contrib.auth',
    'django.contrib.contenttypes',
    'django.contrib.sessions',
    'django.contrib.messages',
    'django.contrib.staticfiles',
    'blog', #new
]
Database Models
Next, create Category and Article models in blog/models.py:
# blog/models.py
from django.contrib.auth.models import User
from django.db import models

class Category(models.Model):
    name = models.CharField(max_length=32)
    description = models.TextField(null=True, blank=True)
class Meta:
        verbose_name_plural = 'categories'
def __str__(self):
        return self.name

ARTICLE_TYPES = [
    ('UN', 'Unspecified'),
    ('TU', 'Tutorial'),
    ('RS', 'Research'),
    ('RW', 'Review'),
]

class Article(models.Model):
    title = models.CharField(max_length=256)
    author = models.ForeignKey(to=User, on_delete=models.CASCADE)
    type = models.CharField(max_length=2, choices=ARTICLE_TYPES, default='UN')
    categories = models.ManyToManyField(to=Category, blank=True, related_name='categories')
    content = models.TextField()
    created_datetime = models.DateTimeField(auto_now_add=True)
    updated_datetime = models.DateTimeField(auto_now=True)

def __str__(self):
        return  self.author
checkpoint:
Categoryrepresents an article category.Articlerepresents an individual article. Each article can have multiple categories. Articles have a specific type.- Authors are represented by the default Django user model.
Run Migrations
Make migrations and then apply them:
(env)$ python manage.py makemigrations
(env)$ python manage.py migrate
Register the models in blog/admin.py:
# Register your models here.
from django.contrib import admin
from . import models
@admin.register(models.Category)
class CategoryAdmin(admin.ModelAdmin):
       list_display = [
        'name',
    ]


@admin.register(models.Article)
class ArticleAdmin(admin.ModelAdmin):
       list_display = [
        'title',
        'author',
        'type',
        'content',

    ]
Populate the Database
We need some data to work with before proceeding to the next phase. I made a quick command that we may use to fill the database.
Create a new folder in “blog” called “management”, and then inside that folder create another folder called “commands”. Inside the “commands” folder, create a new file called populate_db.py.
management
└── commands
    └── populate_db.py
Copy the file contents from populate_db.py and paste them inside your populate_db.py.
Run the following command to populate the DB:
(env)$ python manage.py populate_db
If everything went well you should see a Successfully populated the database. message in the console and there should be a few articles in your database.
Django REST Framework
Now let’s install djangorestframework using pip:
(env)$ pip install djangorestframework
Register it in our settings.py like so:
# core/settings.py
INSTALLED_APPS = [
    'django.contrib.admin',
    'django.contrib.auth',
    'django.contrib.contenttypes',
    'django.contrib.sessions',
    'django.contrib.messages',
    'django.contrib.staticfiles',
    'blog', #new
    'rest_framework', # new
]
Add the following settings:
# core/settings.py
REST_FRAMEWORK = {
    'DEFAULT_PAGINATION_CLASS': 'rest_framework.pagination.LimitOffsetPagination',
    'PAGE_SIZE': 25
}
We’ll need these settings to implement pagination.
Create Serializers
We must develop a serializer for each of our Django models in order to serialize them. Utilizing the ModelSerializer class is the easiest approach to developing serializers that rely on Django models.
blog/serializers.py:
# blog/serializer.py

from django.contrib.auth.models import User
from rest_framework import serializers
from blog.models import Article, Category

class UserSerializer(serializers.ModelSerializer):
    class Meta:
        model = User
        fields = ('id', 'username', 'first_name', 'last_name')

class CategorySerializer(serializers.ModelSerializer):
    class Meta:
        model = Category
        fields = '__all__'

class ArticleSerializer(serializers.ModelSerializer):
    author = UserSerializer()
    categories = CategorySerializer(many=True)
class Meta:
        model = Article
        fields = '__all__'
Notes:
UserSerializerandCategorySerializerare fairly simple: We just provided the fields we want serialized.- In the
ArticleSerializer, we needed to take care of the relationships to make sure they also get serialized. This is why we providedUserSerializerandCategorySerializer.
Create ViewSets
Let’s create a ViewSet for each of our models in blog/views.py:
#blog/views.pyfrom django.contrib.auth.models import User
from rest_framework import viewsets
from blog.models import Category, Article
from blog.serializers import CategorySerializer, ArticleSerializer, UserSerializer
class UserViewSet(viewsets.ModelViewSet):
serializer_class = UserSerializer
queryset = User.objects.all()
class CategoryViewSet(viewsets.ModelViewSet):
serializer_class = CategorySerializer
queryset = Category.objects.all()
class ArticleViewSet(viewsets.ModelViewSet):
serializer_class = ArticleSerializer
queryset = Article.objects.all()
In this block of code, we created the ViewSets by providing the serializer_class and queryset for each ViewSet.
Define URLs
Create the app-level URLs for the ViewSets:
 # blog/urls.py
from django.urls import path, include
from rest_framework import routers
from blog.views import UserViewSet, CategoryViewSet, ArticleViewSet
router = routers.DefaultRouter()
router.register(r'user', UserViewSet)
router.register(r'category', CategoryViewSet)
router.register(r'article', ArticleViewSet)

urlpatterns = [
    path('', include(router.urls)),
]
Then, wire up the app URLs to the project URLs:
 # core/urls.py

from django.contrib import admin
from django.urls import path, include

urlpatterns = [
    path('blog/', include('blog.urls')),
    path('admin/', admin.site.urls),
]
These URLs are now available in our app:
/blog/user/lists all users/blog/user/<USER_ID>/fetches a specific user/blog/category/lists all categories/blog/category/<CATEGORY_ID>/fetches a specific category/blog/article/lists all articles/blog/article/<ARTICLE_ID>/fetches a specific article
Testing
Now that we’ve registered the URLs, we can test the endpoints to see if everything works correctly.
Run the development server:
(env)$ python manage.py runserver
Then, in your browser of choice, navigate to http://127.0.0.1:8000/blog/article/.
The response should be in a json.
Manually test the other endpoints as well.
Elasticsearch Setup
Start by installing and running Elasticsearch in the background.
$ docker run -p 9200:9200 -p 9300:9300 -e "discovery.type=single-node" docker.elastic.co/elasticsearch/elasticsearch:7.14.0To integrate Elasticsearch with Django, we need to install the following packages:
- elasticsearch — official low-level Python client for Elasticsearch
- elasticsearch-dsl-py — high-level library for writing and running queries against Elasticsearch
- django-elasticsearch-dsl — wrapper around elasticsearch-dsl-py that allows indexing Django models in Elasticsearch
Install:
(env)$ pip install elasticsearch
(env)$ pip install elasticsearch-dsl
(env)$ pip install django-elasticsearch-dsl
Start a new app called search, which will hold our Elasticsearch documents, indexes, and queries:
(env)$ python manage.py startapp search
Register the search and django_elasticsearch_dsl in core/settings.py under INSTALLED_APPS
# core/settings.py
INSTALLED_APPS = [
    'django.contrib.admin',
    'django.contrib.auth',
    'django.contrib.contenttypes',
    'django.contrib.sessions',
    'django.contrib.messages',
    'django.contrib.staticfiles',
    'blog', #new
    'search',#new
    'rest_framework', # new
]
Now we need to let Django know where Elasticsearch is running. We do that by adding the following to our core/settings.py file:
# core/settings.py
# Elasticsearch
# https://django-elasticsearch-dsl.readthedocs.io/en/latest/settings.html

ELASTICSEARCH_DSL = {
    'default': {
        'hosts': 'localhost:9200'
    },
}
If your Elasticsearch is running on a different port, make sure to change the above settings accordingly.
We can test if Django can connect to Elasticsearch by starting our server:
(env)$ python manage.py runserver
If your Django server fails, Elasticsearch is probably not working correctly.
Creating Documents
Before creating the documents, we need to make sure all the data is going to get saved in the proper format. We’re using CharField(max_length=2) for our article type, which by itself doesn't make much sense. This is why we'll transform it to human-readable text.
We’ll achieve this by adding a type_to_string() method inside our model like so:
# blog/models.py

class Article(models.Model):
    title = models.CharField(max_length=256)
    author = models.ForeignKey(to=User, on_delete=models.CASCADE)
    type = models.CharField(max_length=2, choices=ARTICLE_TYPES, default='UN')
    categories = models.ManyToManyField(to=Category, blank=True, related_name='categories')
    content = models.TextField()
    created_datetime = models.DateTimeField(auto_now_add=True)
    updated_datetime = models.DateTimeField(auto_now=True)
# new
    def type_to_string(self):
        if self.type == 'UN':
            return 'Unspecified'
        elif self.type == 'TU':
            return 'Tutorial'
        elif self.type == 'RS':
            return 'Research'
        elif self.type == 'RW':
            return 'Review'
   def __str__(self):
      return  self.author
Without type_to_string() our model would be serialized like this:
{
    "title": "This is my article.",
    "type": "TU",
    ...
}
After implementing type_to_string() our model is serialized like this:
{
    "title": "This is my article.",
    "type": "Tutorial",
    ...
}
Now let’s create the documents. Each document needs to have an Index and Django class. In the Index class, we need to provide the index name and Elasticsearch index settings. In the Django class, we tell the document which Django model to associate it to and provide the fields we want to be indexed.
blog/documents.py:
# blog/documents.pyfrom django.contrib.auth.models import User
from django_elasticsearch_dsl import Document, fields
from django_elasticsearch_dsl.registries import registry
from blog.models import Category, Article
@registry.register_document
class UserDocument(Document):
class Index:
name = 'users'
settings = {
'number_of_shards': 1,
'number_of_replicas': 0,
}
class Django:
model = User
fields = [
'id',
'first_name',
'last_name',
'username',
]
@registry.register_document
class CategoryDocument(Document):
id = fields.IntegerField()
class Index:
name = 'categories'
settings = {
'number_of_shards': 1,
'number_of_replicas': 0,
}
class Django:
model = Category
fields = [
'name',
'description',
]
@registry.register_document
class ArticleDocument(Document):
author = fields.ObjectField(properties={
'id': fields.IntegerField(),
'first_name': fields.TextField(),
'last_name': fields.TextField(),
'username': fields.TextField(),
})
categories = fields.ObjectField(properties={
'id': fields.IntegerField(),
'name': fields.TextField(),
'description': fields.TextField(),
})
type = fields.TextField(attr='type_to_string')
class Index:
name = 'articles'
settings = {
'number_of_shards': 1,
'number_of_replicas': 0,
}
class Django:
model = Article
fields = [
'title',
'content',
'created_datetime',
'updated_datetime',
]Notes:
- In order to transform the article type, we added the
typeattribute to theArticleDocument. - Because our
Articlemodel is in a many-to-many (M:N) relationship withCategoryand a many-to-one (N:1) relationship withUserwe needed to take care of the relationships. We did that by addingObjectFieldattributes.
Populate Elasticsearch
To create and populate the Elasticsearch index and mapping, use the search_index command:
(env)$ python manage.py search_index --rebuild
Deleting index 'users'
Deleting index 'categories'
Deleting index 'articles'
Creating index 'users'
Creating index 'categories'
Creating index 'articles'
Indexing 3 'User' objects
Indexing 4 'Article' objects
Indexing 4 'Category' objects
Each time you modify your index settings, you must run this command. When a model instance is created, deleted, or modified, django-elasticsearch-dsl created the necessary database signals to update your Elasticsearch store.
Elasticsearch has a number of additional features. To get familiar with the API, try implementing:
- Your own analyzer.
- Completion suggester — when a user queries ‘j’ your app should suggest ‘johhny’ or ‘jess_’.
- Highlighting — when user makes a typo, highlight it (e.g., Linuks -> Linux).
You can see all the Elasticsearch Search APIs here.
Search Views
With that, let’s create sime views. To make our code more DRY we can use the following abstract class in search/views.py:
# search/views.py

import abc

from django.http import HttpResponse
from elasticsearch_dsl import Q
from rest_framework.pagination import LimitOffsetPagination
from rest_framework.views import APIView

class PaginatedElasticSearchAPIView(APIView, LimitOffsetPagination):
    serializer_class = None
    document_class = None

@abc.abstractmethod
    def generate_q_expression(self, query):
        """This method should be overridden
        and return a Q() expression."""
def get(self, request, query):
        try:
            q = self.generate_q_expression(query)
            search = self.document_class.search().query(q)
            response = search.execute()
print(f'Found {response.hits.total.value} hit(s) for query: "{query}"')

results = self.paginate_queryset(response, request, view=self)
            serializer = self.serializer_class(results, many=True)
            return self.get_paginated_response(serializer.data)
        except Exception as e:
            return HttpResponse(e, status=500)
Notes:
- To use the class, we have to provide our
serializer_classanddocument_classand overridegenerate_q_expression(). - The class does nothing else than run the
generate_q_expression()query, fetch the response, paginate it, and return serialized data.
All the views should now inherit from PaginatedElasticSearchAPIView:
# search/views.py

import abc

from django.http import HttpResponse
from elasticsearch_dsl import Q
from rest_framework.pagination import LimitOffsetPagination
from rest_framework.views import APIView
from blog.documents import ArticleDocument, UserDocument, CategoryDocument
from blog.serializers import ArticleSerializer, UserSerializer, CategorySerializer

class PaginatedElasticSearchAPIView(APIView, LimitOffsetPagination):
    serializer_class = None
    document_class = None

@abc.abstractmethod
    def generate_q_expression(self, query):
        """This method should be overridden
        and return a Q() expression."""
def get(self, request, query):
        try:
            q = self.generate_q_expression(query)
            search = self.document_class.search().query(q)
            response = search.execute()

print(f'Found {response.hits.total.value} hit(s) for query: "{query}"')

results = self.paginate_queryset(response, request, view=self)
            serializer = self.serializer_class(results, many=True)
            return self.get_paginated_response(serializer.data)
        except Exception as e:
            return HttpResponse(e, status=500)
# views
class SearchUsers(PaginatedElasticSearchAPIView):
serializer_class = UserSerializer
document_class = UserDocument
def generate_q_expression(self, query):
return Q('bool',
should=[
Q('match', username=query),
Q('match', first_name=query),
Q('match', last_name=query),
], minimum_should_match=1)
class SearchCategories(PaginatedElasticSearchAPIView):
serializer_class = CategorySerializer
document_class = CategoryDocument
def generate_q_expression(self, query):
return Q(
'multi_match', query=query,
fields=[
'name',
'description',
], fuzziness='auto')
class SearchArticles(PaginatedElasticSearchAPIView):
serializer_class = ArticleSerializer
document_class = ArticleDocument
def generate_q_expression(self, query):
return Q(
'multi_match', query=query,
fields=[
'title',
'author',
'type',
'content'
], fuzziness='auto')Define URLs
Lastly, let’s create the URLs for our views:
# search/urls.py
from django.urls import path
from search.views import SearchArticles, SearchCategories, SearchUsers

urlpatterns = [
    path('user/<str:query>/', SearchUsers.as_view()),
    path('category/<str:query>/', SearchCategories.as_view()),
    path('article/<str:query>/', SearchArticles.as_view()),
]
Then, wire up the app URLs to the project URLs:
# core/urls.py
from django.contrib import admin
from django.urls import path, include

urlpatterns = [
    path('blog/', include('blog.urls')),
    path('search/', include('search.urls')), # new
    path('admin/', admin.site.urls),
]
Testing:
Our web application is done.
We can test our search endpoints by visiting the following URLs:
URL Description http://127.0.0.1:8000/search/user/mike/
Returns user ‘mike13’
http://127.0.0.1:8000/search/user/jess_/
Returns user ‘jess_’
http://127.0.0.1:8000/search/category/seo/
Returns category ‘SEO optimization’
http://127.0.0.1:8000/search/category/progreming/
Returns category ‘Programming’
http://127.0.0.1:8000/search/article/linux/
Returns article ‘
Installing the latest version of Ubuntu
http://127.0.0.1:8000/search/article/java/
‘Returns article ‘
Which programming language is the best?’
Notice the typo with the fourth request. We spelled ‘progreming’, but still got the correct result thanks to fuzziness.
If you Want to Learn Python, You can watch my ultimate Python Course on My Youtube Channel.
You can join there as well to share your Queries and suggestions. Facebook Facebook Group: https://web.facebook.com/groups/890525732087988/?mibextid=HsNCOg
You can Also Follow Me on My Social Media Platforms:
Thank You for reading!